Guide: Installation
Quick links:
- Introduction
- Safety Guide & Disclaimer
- Install quick start
- Mounting the electronics
- VESA mounting
- Screen resolution tuning
- Landscape orientation
- Active cooling kit for Surface Book
- Active cooling kit for Surface Pro/Go
Introduction and Support Notes
Thank you for purchasing an ergonomic Vertical docking solution. Once installed, we hope you will enjoy the improved ergonomics of your workstation for years to come.
Need help or have questions? Please email us.
Our solutions are offered in several different packages:
- a basic option where customers use their own Microsoft OEM dock electronics and their own VESA arm to mount the Vertical dock
- an option where Microsoft OEM dock electronics are pre-installed for an additional cost
- an option that includes pre-installed Microsoft OEM dock electronics and a dual VESA arm to mount a monitor and your Vertical dock at a comfortable eye-level
- an option that uses a customer-provided 3rd-party USB-C or Thunderbolt dock/hub
Install directions differ slightly across these options and different VESA monitor arm models. Based on customer feedback, we are continuously improving the usability of our products and the install experience. If you encounter any difficulties, please send us a note including photos of any issue and we'll help step you through it. We offer USA-based email support but will be happy to have quick phone calls or video chats for folks that need a little more help. If you have no experience installing a computer monitor or laptop on a movable VESA arm, it can be challenging. If you need local assistance from an IT technician, we can refer you to a someone in your area to help.
We are a family startup business in Seattle and are familiar with the difficulty of balancing full-time office jobs, children, and hobbies. We design our products with this in mind and hope to make your life easier. We appreciate any and all feedback, so don't hesitate to reach out if you have suggestions on how we can improve.
Safety Guide and legal disclaimer
- The product may contain neodymium magnets and small metal parts which can be choking hazards and may be fatal if swallowed. Please keep unassembled product away from children & pets.
- Allow plastic parts that may have been in cold mail lockers or sitting on a doorstep to come to room temperature prior to installation. Tighten VESA monitor arm mounting screws slowly and carefully. Over-tightening, especially with cold plastic parts, can cause cracks.
- As with many plastic products, prolonged exposure to direct sunlight or heat should be avoided as this will discolor and warp the plastic. This product should not, for example, be left in a hot parked vehicle. For indoor use only.
- Use care when docking and/or rotating your device in landscape/horizontal mode. Excessive force while docking or rotating could damage your device, the dock, or cause injury. For example, if you use the dock in landscape/horizontal mode with a damaged dock, your device could fall and become damaged or cause injury. If you notice damaged parts, contact us for replacement parts immediately.
- VESA monitor arms must be used per manufacturer directions. See the VESA Arm guide for additional precautions.
- In no event shall our company, Dockable LLC (dba Vertical Docks) be liable for any direct, indirect, punitive, incidental, special consequential damages, to property or life, whatsoever arising out of or connected with the use or misuse of our products.
Required tools
- Philips (+) #1 or #2 screwdriver
Required/recommended accessories
- Required: A dock solution such as the Microsoft OEM Dock electronics or a 3rd-party USB-C/Thunderbolt Dock with power supply. If you purchased a Vertical dock model with built-in electronics, a power supply will be included in the box.
- Required: VESA monitor arm/mount with standard 100mm x 100mm mounting plate fastened securely. If you purchased a Vertical dock model with a dual VESA monitor arm/mount, it will be shipped with separate install directions. It is crucial that you pay attention to the manufacturer's directions on fastening your VESA monitor arm/mount properly to your desk for safety. The directions below assume that your VESA monitor arm/mount is already installed securely.
- Recommended: monitor, keyboard, mouse/trackball, monitor cables, and active mini-DisplayPort or USB-C monitor adapters as needed
Vertical Dock for Surface Installation Steps
Getting started (difficulty level: low)

1. Unpack the Vertical Dock from its protective sleeve and bubble-wrap. Inside is the main Vertical Dock body comprised of an acrylic backplate with an attached PETG- 3D-printed "cradle". The hardware mounting/accessory kit comes in a plastic bag.
Note: There are several different Vertical dock configurations - not all parts shown below will come with your dock.

2. Open the hardware/accessory kit and take note of the parts.
Common parts across all Vertical Dock models:
- spring-loaded security latch mechanism (pre-installed on most models)
- fastener kit (4x M4x0.7mm 14mm screws, 4x M4x0.7mm nuts, 4x washers, cable-tie)
Additional parts may be included depending on the options selected at order time.
VESA mounting bars
- 2 horizontal/vertical bars OR
- 2 vertical-only bars
Electronics mounting options
- MS Dock 2 electronics mounting cage (comes with 4-5 M3x6mm screws; MS Dock 1 adapter/spacer avaialble separately) OR
- MS Thunderbolt 4 electronics mounting cage (comes with USB-C right-angle adapter and bottom cover plate pre-installed with 1 screw plus additional M3x6mm screws) OR
- Bottom cover plate only for use with MS Dock 2 electronics (pre-installed onto the main dock cradle with 1 screw and comes with additional M3x6mm screws) OR
- Bottom cover plate with USB-C/TB4 right-angle adapter (pre-installed with 5-8 screws depending on model) OR
- USB-C/TB4 straight-through adapter (available as a separate option for some models and may be pre-installed)
Active cooling kit
- plastic mount
- blower fan (pre-installed on plastic mount)
- right-angle USB-A adapter
- USB A fan speed controller
If you believe you are missing parts or received wrong/damaged parts, please contact us.

3. If your Vertical Dock model included a separate spring-loaded security hinge mechanism, unwrap it, fit the mechanism in place taking note of the orientation and secure with included screws. Don't overtighten otherwise you can damage the plastic or strip the screws.

4. Inspect hinge mechanism and ensure the rear attachment does not have any gaps once the screws are tightened. Test fit your Surface in the Dock to make sure it fits the bottom cradle and the top spring-loaded hinge mechanism. If the spring-loaded latch is too small to fit all the way around the edge of your Surface contact us and we'll send a replacement.
Mounting Electronics (difficulty level: low)
Note: There are several options for mounting electronics depending on the model ordered. Not all steps will apply to your model.
Optional step: Attaching Bottom Cover Plate (comes with USB-C and customized orders)

Important note: If you are using USB-C AND the Microsoft electronics simultaneously, you can skip this step. Instead, just put the cover plate in place without screws.
1. Align the cover plate as shown and fasten with included screws. Somes models use 4 screws, others use 5 or 6. Tighten carefully so that the cover is flush with the Dock "cradle". Don't overtighten otherwise you can crack the plastic or strip the screws.
Mounting Microsoft Dock electronics

1. Gather the main Dock body, electronics, and mounting cage.

2. Pass the MS OEM dock connector and cable through the cutout in the mounting cage

3. Place the electronics. Gently bend the cable to clear the edge of the cutout. The electronics will fit snuggly within the cage but may not drop in easily at first.

4. To ease fitment, flip the electronics and cage upside-down and gently apply outward pressure to the left and right edges of the cage. Do not apply too much pressure otherwise you may damage the plastic. If you need to remove the MS dock electronics in the future, you can reverse this process.

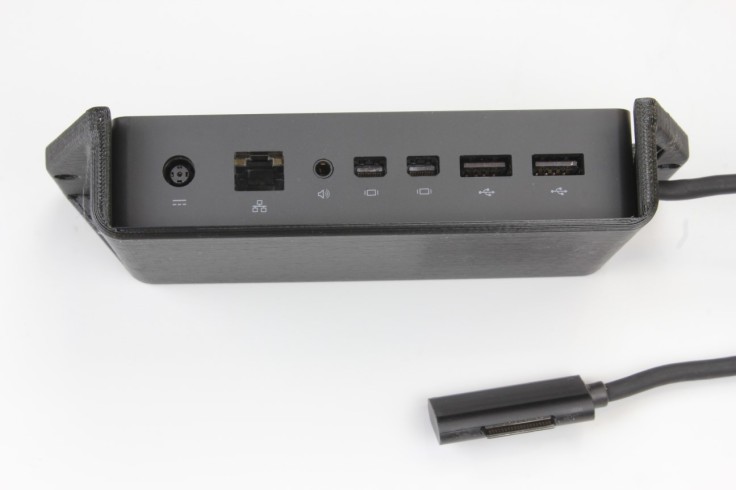
5. Route the cable as shown


6. A spacer is included with some models to adapt the smaller MS Dock 1 to fit in a cage designed for the MS Dock 2. If there is a gap between the rear of the Dock 1 electronics and the mounting cage, place the spacer in the gap as shown to hold the electronics firmly in place. If your dock electronics don't fit, please contact us.

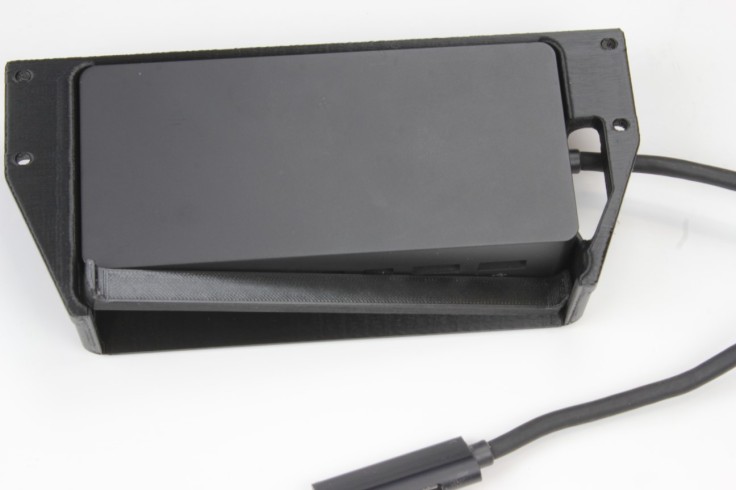
7. Dock electronics installed (Top: Microsoft Dock 1; Bottom: Dock 2)

8. Gather main dock body, electronics, and screws.


9. Critical step Fit the Surface docking connector into the main dock "cradle" and route the cable in the channel. Ensure the connector is going in straight and not at an angle, otherwise it can get stuck and you'll have to re-try. If you continue to have difficulty fitting the connector, inspect the cavity for debris from the manufacturing process and remove as needed. If difficulty persists, you can dab a drop of vegetable oil in the cavity to help the connector slide in. Ensure the Dock connector is all the way into the cavity and protrudes through the "cradle". If you get stuck, please contact us.

 Important note: If you have a USB-C model, ensure the cover plate is in place between the electronics cage and the main dock body.
10. Lay the main dock body and the electronics on a flat surface. Align the screw holes and then use the provided screws. If using USB-C, ensure the cover plate is in place between the cage and main dock cradle. Tighten all screws evenly until you get some resistance. Some models require 4 screws, some 5. Your cage may have extra holes for different Vertical Dock models.

11. Critical step Tighten the screws evenly and carefully the rest of the way. Don't overtighten otherwise you can damage the plastic or strip the screws - but do ensure the electronics cage and main dock cradle are flush. Due to manufacturing tolerances of 3D-printed parts, you may notice light shine through between the electronics and the cradle. This is normal and won't be an issue once everything is installed.

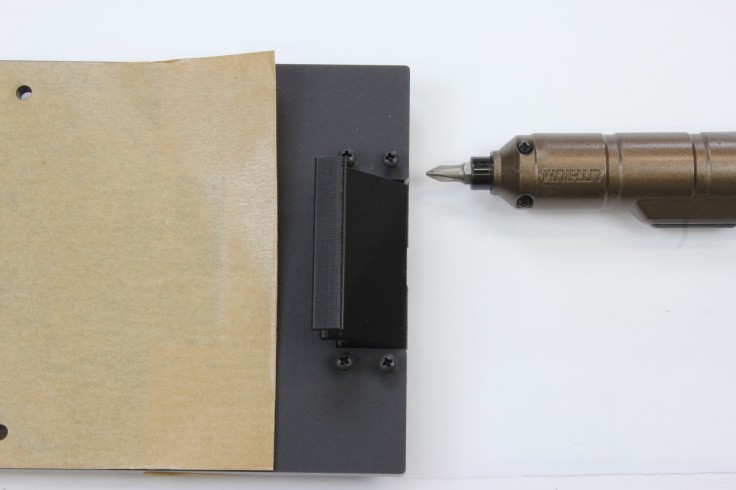
12. Use the provided cable-tie to cinch the cable out of the way. Do not cinch the cable too tightly otherwise you may damage the cable. Finally, peel off the protective paper.
Congratulations, you have completed assembly of the Vertical Dock! Let's build the rest of your workstation...
VESA arm mounting (difficulty level: high)
Although some Vertical Dock models can be used standalone without a VESA arm, it is easy to knock over accidentally and is not something we recommend. For best ergonomics, the Dock should be mounted to a 100 x 100mm VESA arm or monitor mount
It is crucial that you follow all safety precautions included with your VESA arm/mount otherwise injury or damage to your Dock and Surface device may result! Important Notes:
- If you have an optional cooling kit, it is easier to install it prior to mounting the vertical dock on the VESA arm.
- If you will be using the horizontal/landscape mounting bars, please review the landscape notes then return here.

1. Select two VESA mounting bars to fasten the Vertical dock to a VESA monitor arm/mount. Your install kit will include either vertical-only short mounting bars, or longer hooked bars that can be used for either vertical or horizontal orientations. Depending on the model ordered, the bars may be shaped differently.
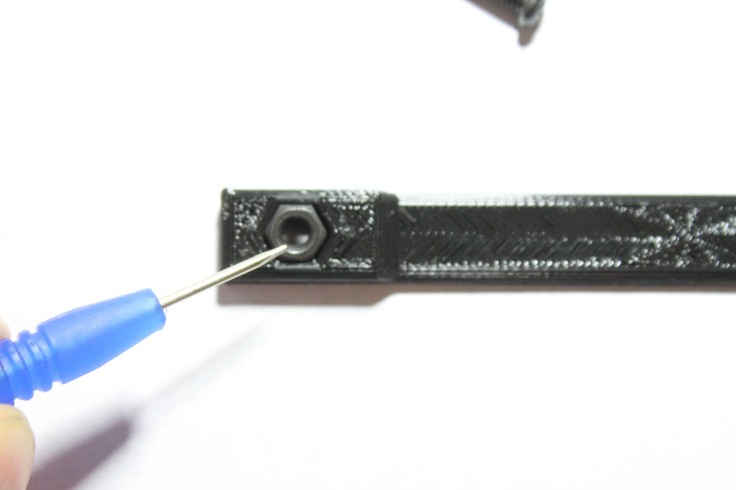

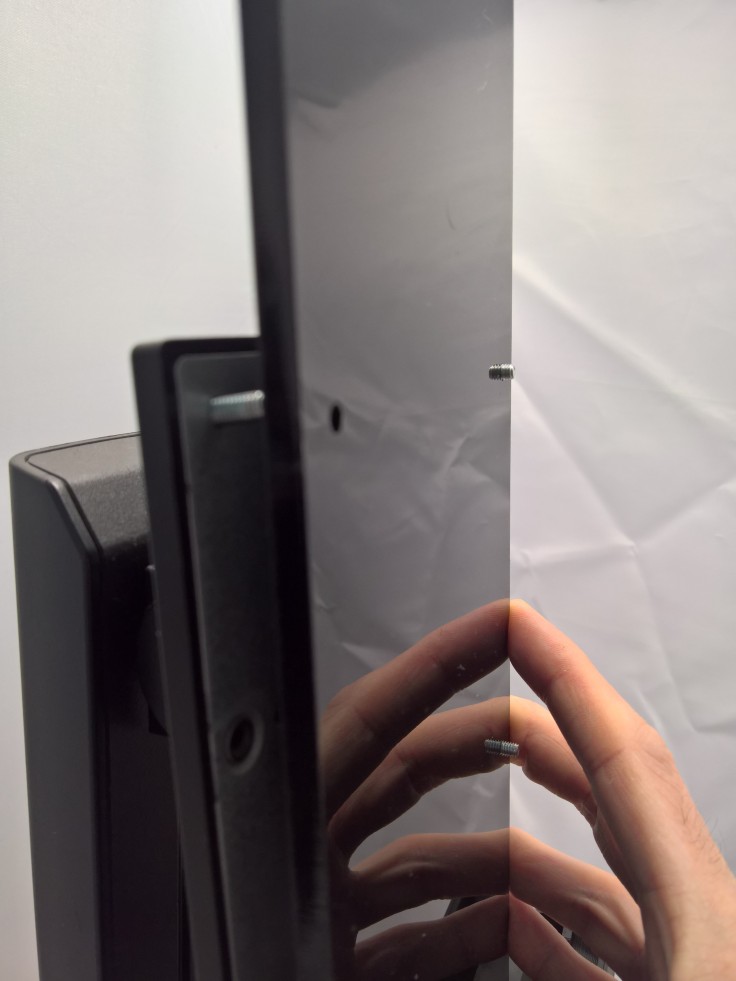
2. If your selected bars do not have M4 nuts pre-installed, install them now. If a nut is difficult to fit, try threading it onto a screw and pulling the nut into place as shown. Once the nut is in place, loosen the screw and the nut should stay lodged in the bar.
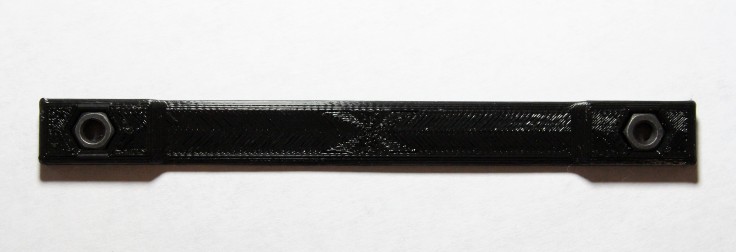
3. Nuts installed flush with the mounting bar and screws removed.


4. Ensure your VESA monitor arm/mount is securely mounted to your desk. Then place 4x M4x14mm screws (included) through the rear of your VESA monitor arm 100mm x 100mm mounting plate. The mounting plate shown is just an example and will likely look different than yours. Some VESA arms have large holes making it difficult to use the included screws. In this case you can use the incuded washers in combination with the screws.
Pause
Are you using the longer hooked mounting bars? If so, double-check whether your VESA arm has a rotation capability. Some rotate 90 degrees, some 360 degrees, and some don't rotate at all. For mounts that rotate 90 degrees, determine whether the rotation is clockwise or counter-clockwise so that when rotating the Vertical Dock from vertical to horizontal orientation, the long hooked bars support the bottom of the Surface.
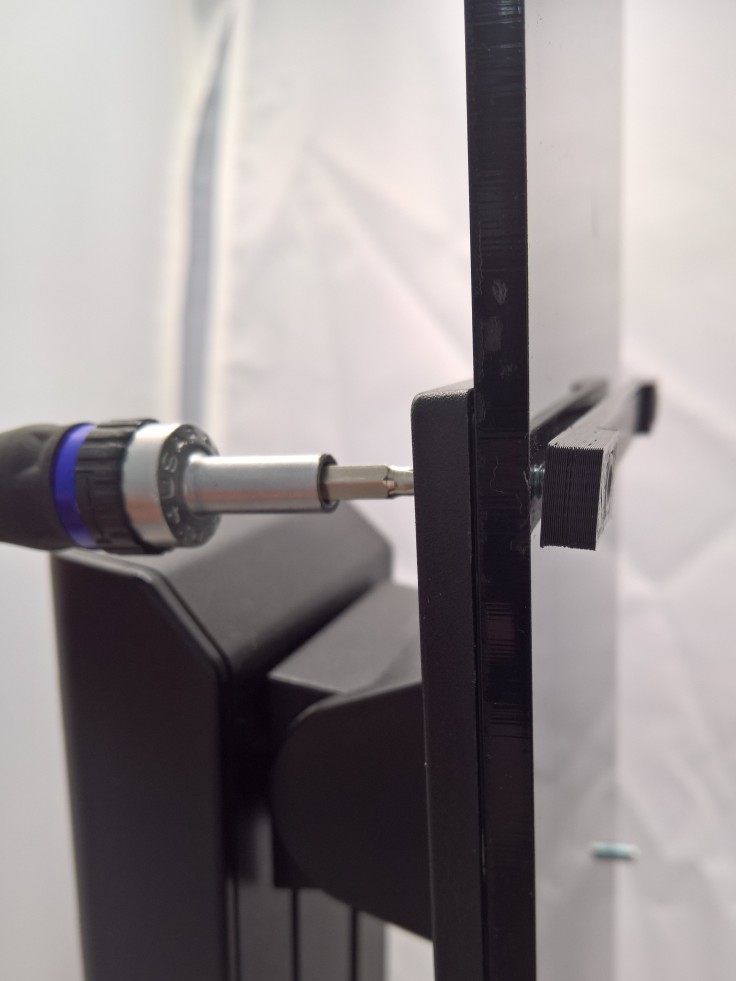

5. Difficult step: Having a another person is quite helpful for this step. To attach the Vertical Dock to your VESA monitor arm, carefully hold the Vertical dock and a mounting bar in place while turning the screws from the rear of the VESA monitor arm attachment point to engage the nuts. Refer to your VESA monitor arm manufacturer owner’s manual for more specific instructions.
Note: While the provided M4x14mm screws have been tested on a variety of VESA monitor arm styles, we can't guarantee they will work for *all* VESA arms. Depending on the thickness of your manufacturer's VESA arm mounting plate, you may need longer or shorter screws. If the screws are too short, M4x16mm screws from a hardware store may work better. If the screws are too long, adding washers in between the screw head and the rear of the vertical dock will work, as will using shorter M4x12mm screws. If you are having difficulty with the screws, do contact us and we'll do our best to resolve your issue.

6. Here is the final assembly in Vertical orientation (Surface Book 2 model pictured)
Optional Steps
Landscape/Horizontal mounting (difficulty level: high)
Some docks ship with optional mounting bars that can be used for both vertical and horizontal orientations. For Surface Book models, the curved portion of the long bars must point towards the right. For Surface Pro and Go, the bars can point to the left or the right depending on webcam position preference.
 1. Example: Surface Pro 4-7+ and Go-Go4 with webcam at the top when in horizontal orientation. For this setup the mounting bars point to the left. We recommend disconnecting the keyboard before docking to prevent the keyboard from rubbing on the mounting bars. If you do choose to use with the keyboard attached, be extra careful to not rub or snag the flexible portion of the keyboard on the mounting bars otherwise you can damage the keyboard.
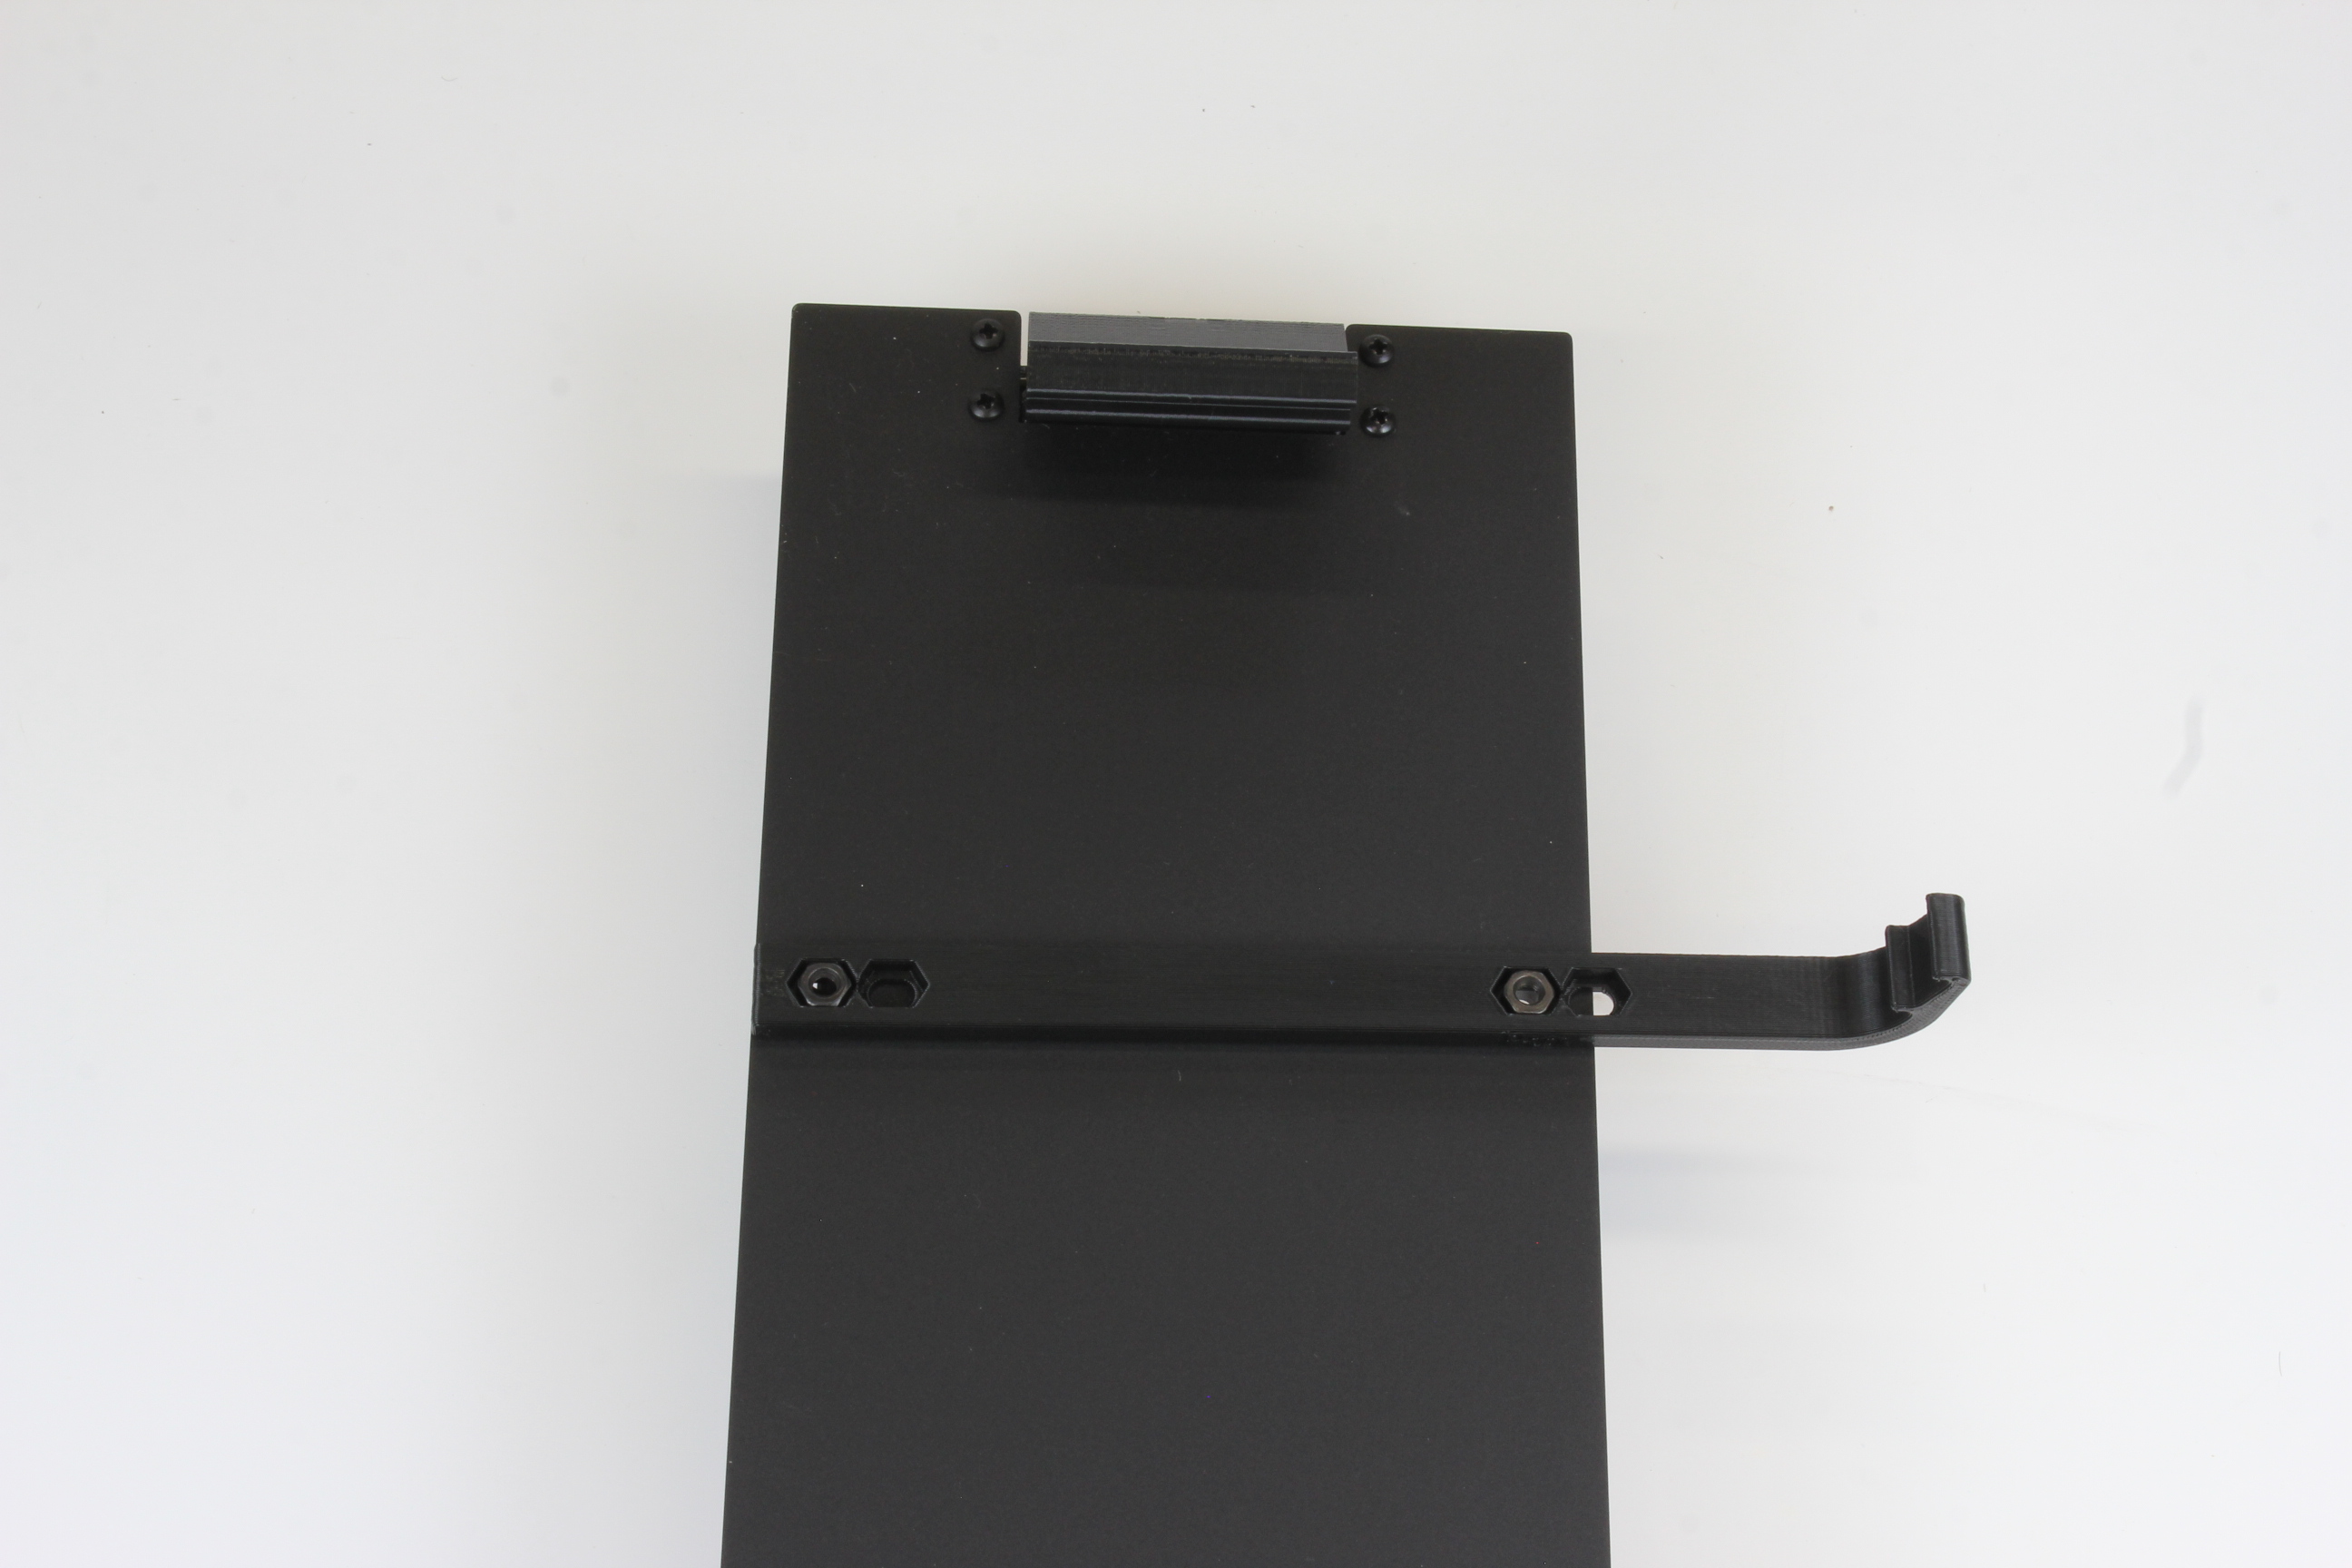 2. Example: Surface Pro 4-7+ or Go-Go4 with web camera at bottom when in horizontal orientation. For this setup, bars point to the right. The keyboard can remain attached and flipped around the rear of the tablet.
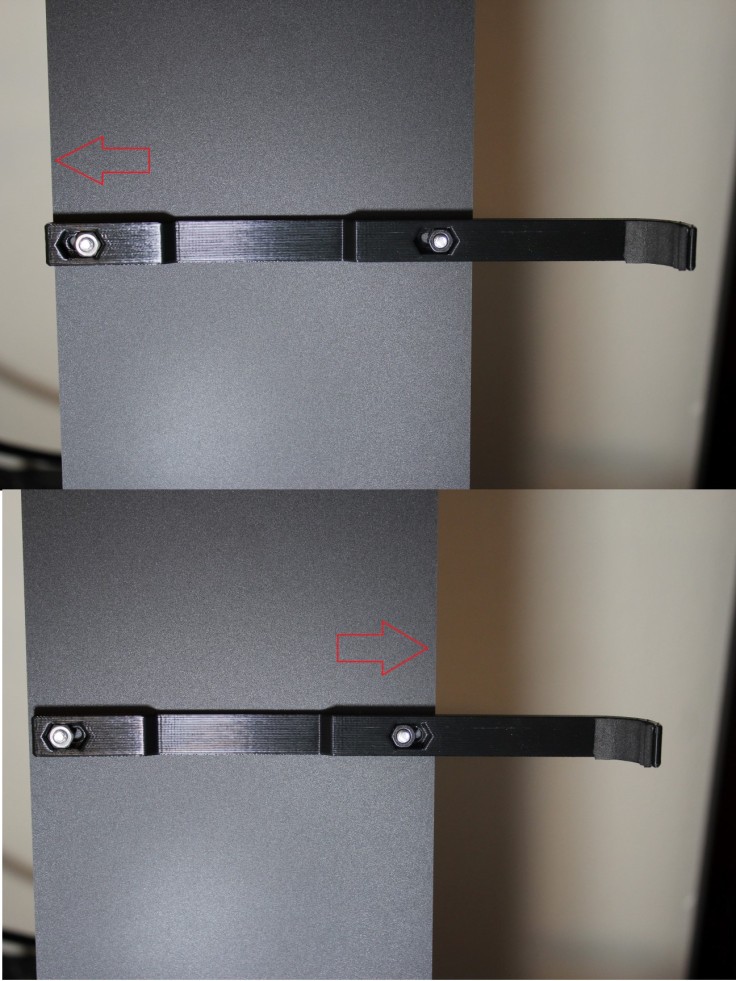
3. Depending on the Vertical dock model ordered, the longer hooked mounting bars may have some lateral adjustment to allow fine-tuning to ensure the best connection with the dock electronics. To fine-tune, loosen the M4x14mm screws by 1/2 turn and slide the mounting bars to find the best position, then re-tighten the screws. Make sure to test in both vertical and horizontal orientations to ensure you have the fitment correct.
Note: Some models may have foam pads adhered to the mounting bars to provide better grip. These pads may compress over time so some adjustment may be required after initial installation to ensure a consistent connection with the dock electronics.
Screen resolution tuning (difficulty level: high)
The custom screen resolution guide will help to match the size of Windows UI and applications on your Surface screen to the size on your desktop monitors.
Active cooling kit (difficulty level: medium)
Surface Book Notes
- The Surface Book may be docked in two positions: a) Closed where the tablet touches the keyboard base (best for pen/touch use) or b) ajar by about 1cm to provide better airflow and cooling.
- Because the MS OEM docking electronics supply power to the USB ports at all times, we recommend switching the fan off manually when undocking. Also, when docking and undocking, the fan may pause for 2-3 seconds while the dock electronics initialize.

1. In the box:
- 75x15mm 5v 6cfm blower fan
- USB cable/toggle switch (newer kits include a USB fan speed controller and a USB right-angle adapter instead)
- 3D-printed fan carrier
- 20mm M4 screw and nut

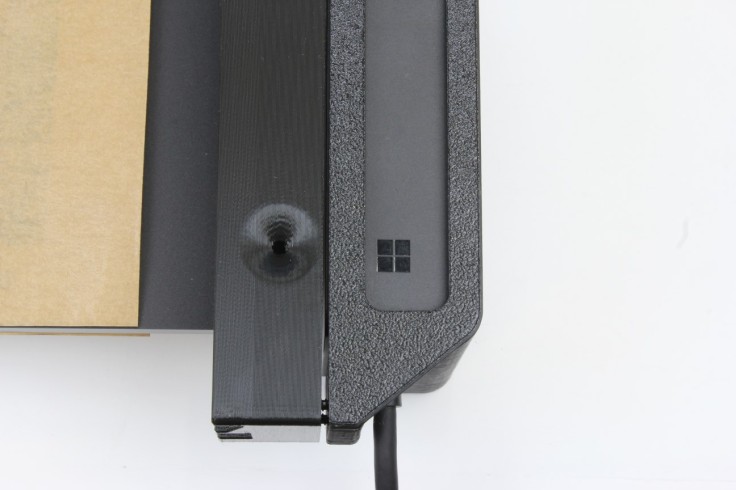
2. Place Vertical Dock face down (if already fastened to a VESA arm, it may be easier to unfasten it). Loosen the M4 screw 3 full turns but don't remove it.
If you unscrew too far, a nut inside the dock may dislodge requiring an extra installation step.

3. Slide the fan carrier over the screw head and tighten the M4 screw. Try to keep the screw head centered on the fan carrier while you tighten. If the screw comes out and doesn't engage, tilt the main dock upside-down so that the security hinge points down, then tap the area with the problem screw with the screwdriver a few times. This will allow the internal nut to move back to the right place. Continue tightening the screw in this inverted orientation making sure that the main backplate is aligned flush with the dock's "cradle".
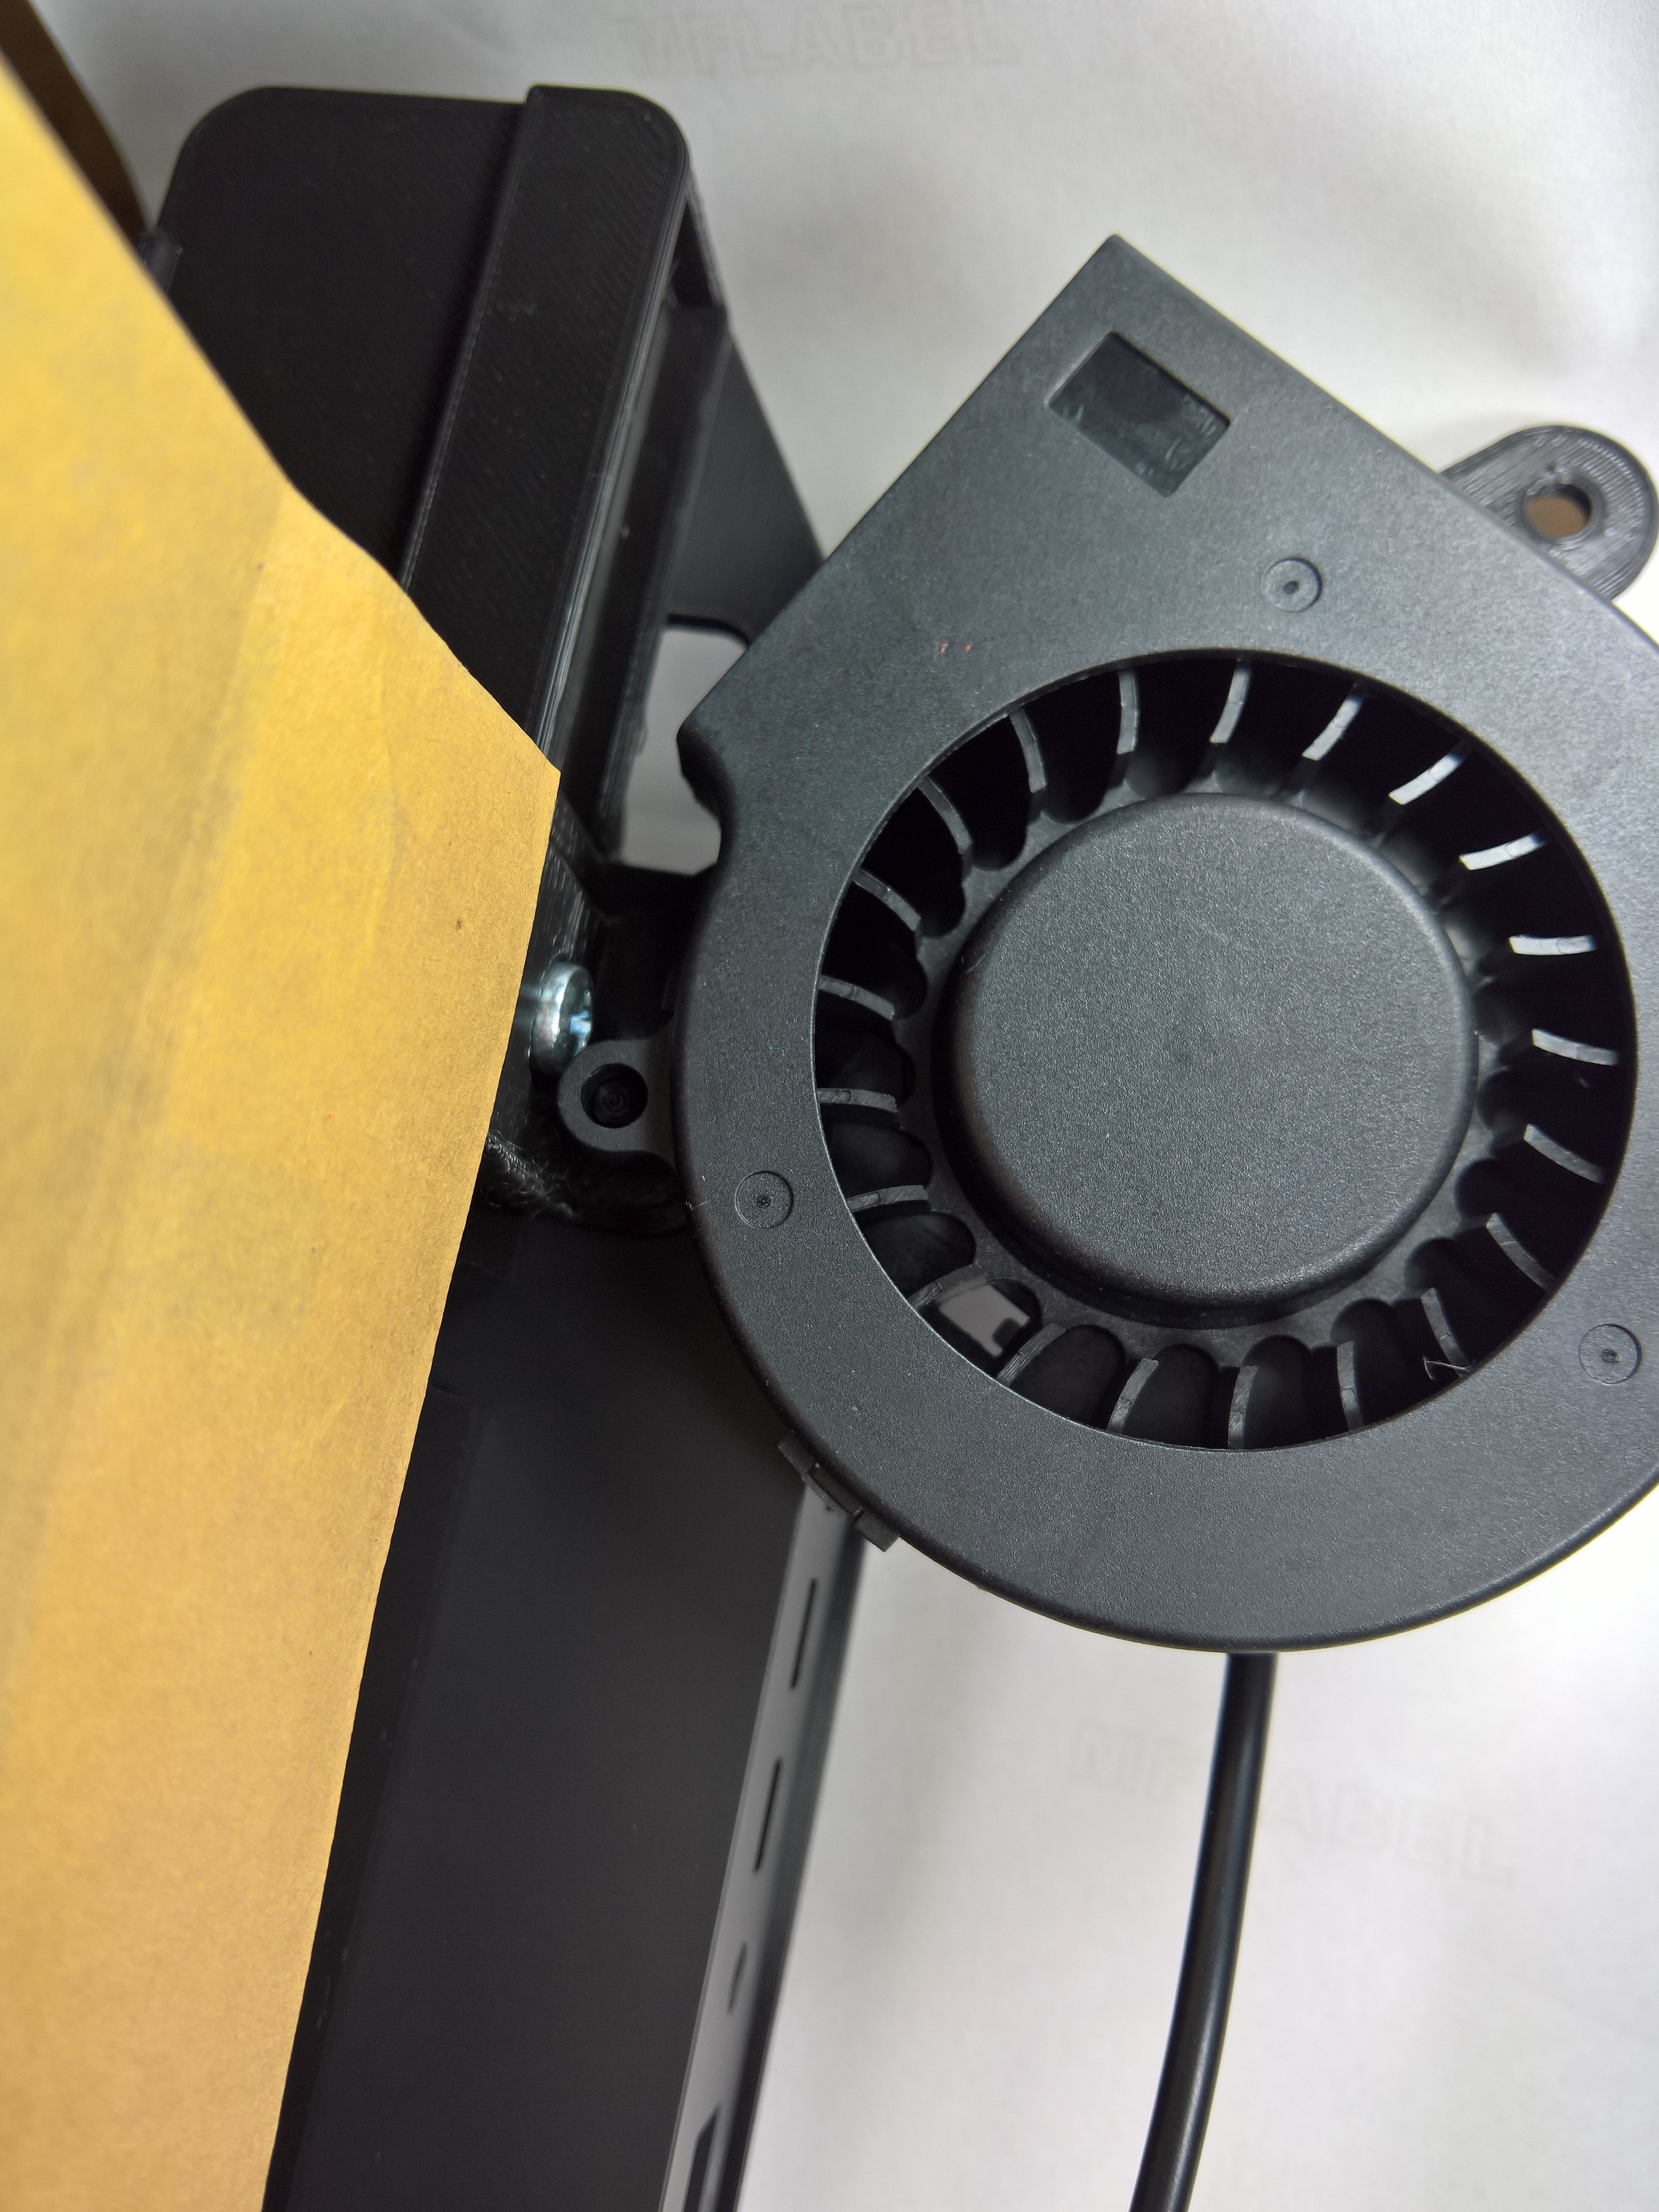
4. Place fan on the fan-carrier post with large circular air intake facing up and the label facing down as pictured.
5. Carefully rotate the fan so that the outlet fits into the Vertical Dock. You may need to apply a little pressure to get it to fit in. If it doesn't fit, try taking the fan off, loosening fan carrier -> cradle screw by half a turn and sliding the fan carrier left or right slightly and then re-fitting the fan. When tightening the screw, make sure that the main backplate is aligned flush with the dock's "cradle".

6. Drop the supplied screw in from the top. You may need use two hands here to bend the fan carrier slightly to align the hole with the screw. Fasten the nut on the bottom - it only needs to be finger tight but you can turn it 1/2 turn with pliers if you wish. Don't overtighten otherwise you can damage the plastic.
Surface Pro notes
Included in the kit:
- 75x15mm 5v 6cfm blower fan
- USB fan speed controller and a right-angle USB adapter
- 3D-printed fan carrier
- M4x20 screw with nuts will be pre-installed
Installation steps:
- Remove Vertical Dock from VESA mount
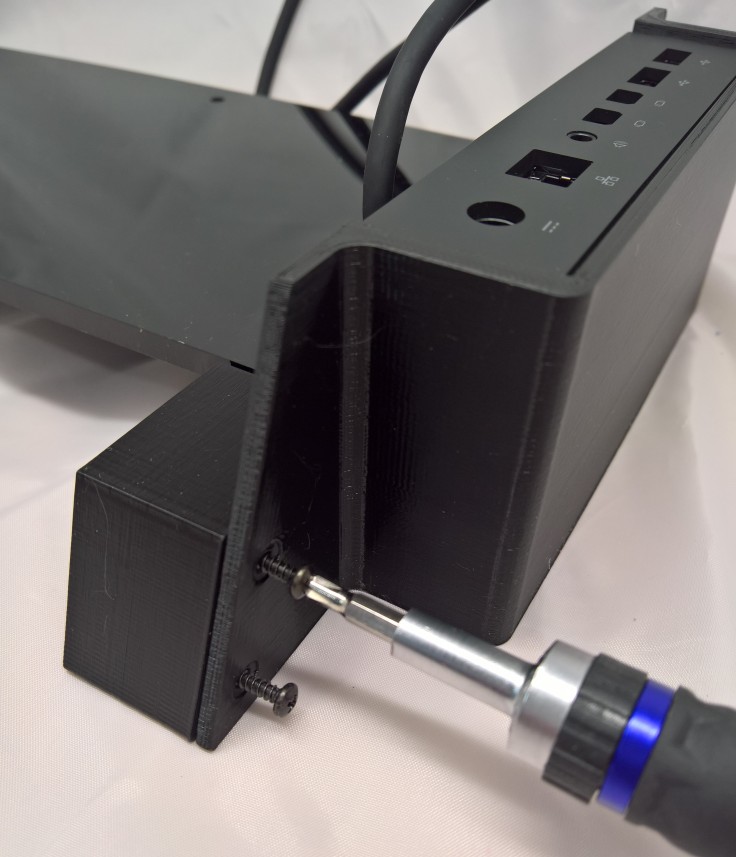
- Tilt dock upside down so that the security hinge points down, and turn the dock so that you are viewing the rear side. Then loosen one M4 screw on the right as pictured


- Position the cooling kit assembly to line up with the screw hole as pictured.

- Replace and tighten screw. If the screw does not thread in, an internal nut may have dislodged. Just tap the area with the problem screw with the screwdriver a few times while holding the Vertical dock upside down. This will allow the internal nut to move back to the right place. Continue tightening the screw in this inverted orientation making sure that the main backplate is aligned flush with the dock's "cradle".


Fan speed controller note:

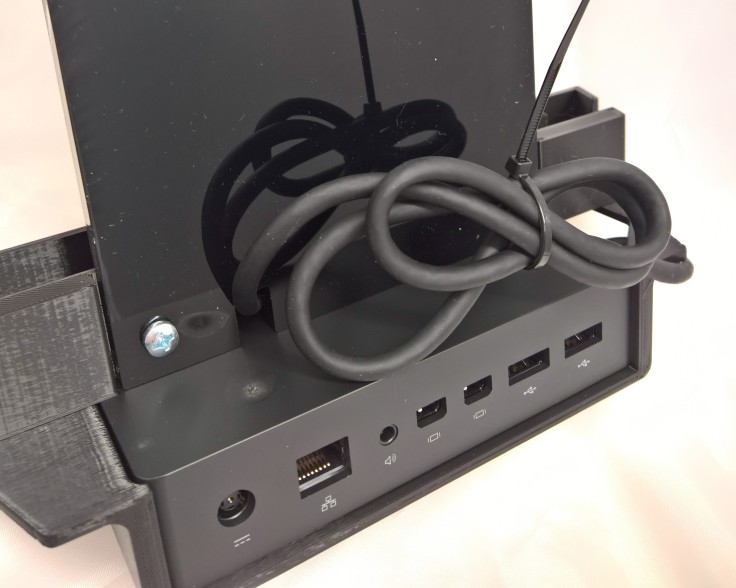
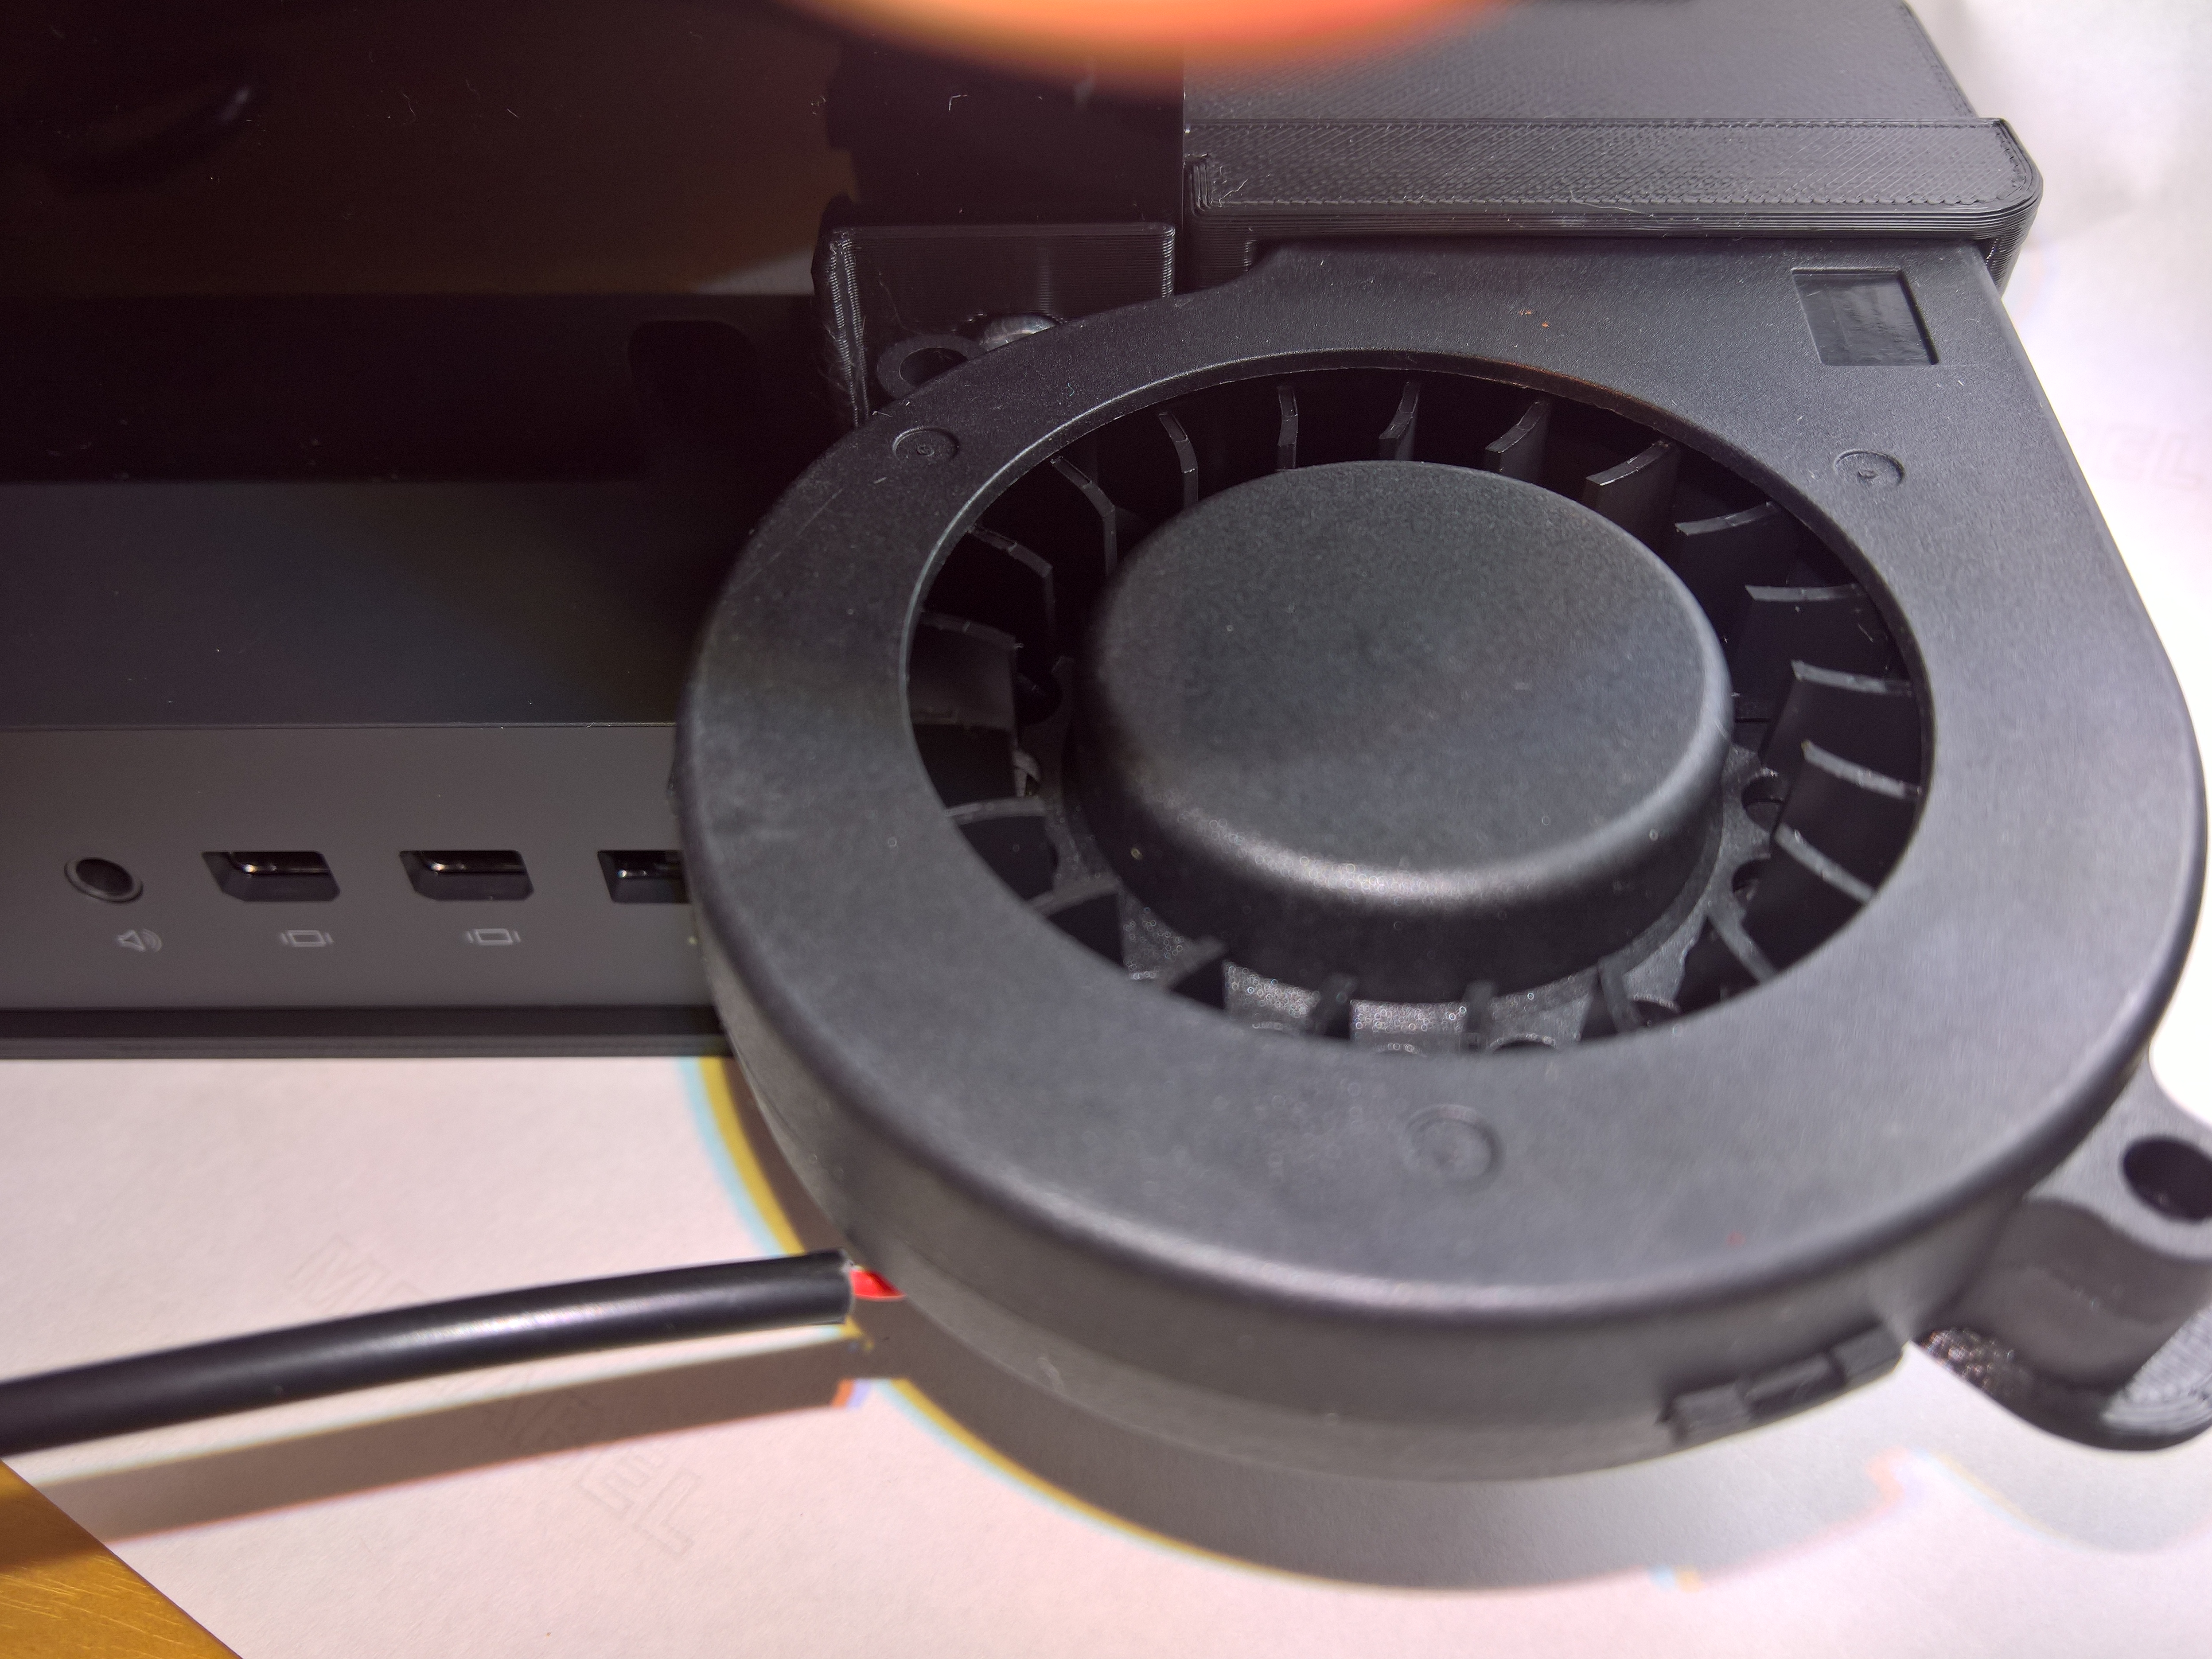
- Plug the fan into the speed controller, then the speed controller into the right-angle adapter, then the right-angle adapter into a free USB port on your Dock electronics as pictured. For Surface Book models, the edge of the fan speed controller may rest against the fan.
- Power up the MS Dock electronics then switch the fan speed controller on by turning the dial. For Surface Book models, air should flow out of a channel in the middle of the Vertical Dock cradle to cool both the tablet/clipboard and keyboard-base portions of the Surface Book. For Surface Pro/Go models, air should flow in between the tablet and the main vertical dock back-plate.
- The fan speed controller has a dial/switch combo to turn on the fan and adjust the speed. Make sure to adjust the fan speed slowly. Adjusting it abruptly may result in increased fan noise but no additional airflow. The controller has quite a bit of speed range. Only the lower ~67% of the range is applicable to the specific fan included in the kit. If you adjust beyond ~67%, then the fan noise may increase without any increased airflow or the fan may stall.